WP Contacts is packed with options for customizing the appearance and the operation of how you are going to work with the tool. After installing and activating WP Contacts you will want to configure some settings for it.
Table of Contents
Open Table of Contents
First Steps
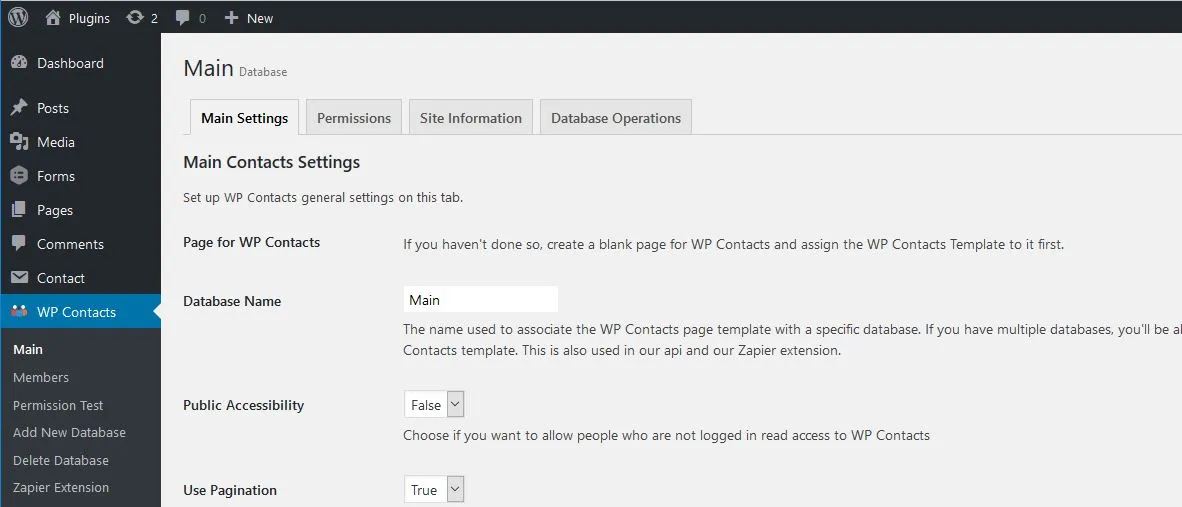
The first thing to do is go to the WP Contacts tab on the left side of your WordPress Admin bar which is shown here:

Database Management
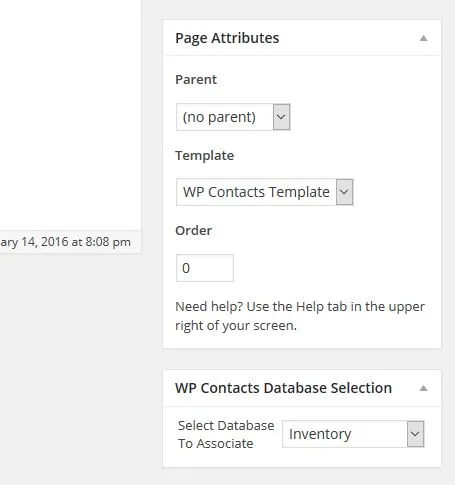
With WP Contacts you can now create and manage as many separate databases as you want! Each database has it’s own settings, permissions, snapshots and is completely independent from any others you create. You can add and remove databases at any time. After you have created one and have created a page for WP Contacts be sure to select the database you want to use on that page like in the WordPress page view screenshot below:

There are currently 4 tabs (we may add others later) within the WP Contacts settings, the first tab will have general settings for the tool, the second tab will have user permissions, and the third tab has information about your site (file upload size, memory etc.) and is purely for reference. The forth tab lets you take snapshots, restore and reset the database you are working on. You can also download backups for safe keeping in zipped format now from the database tab as well.
WP Contacts Main Settings Tab
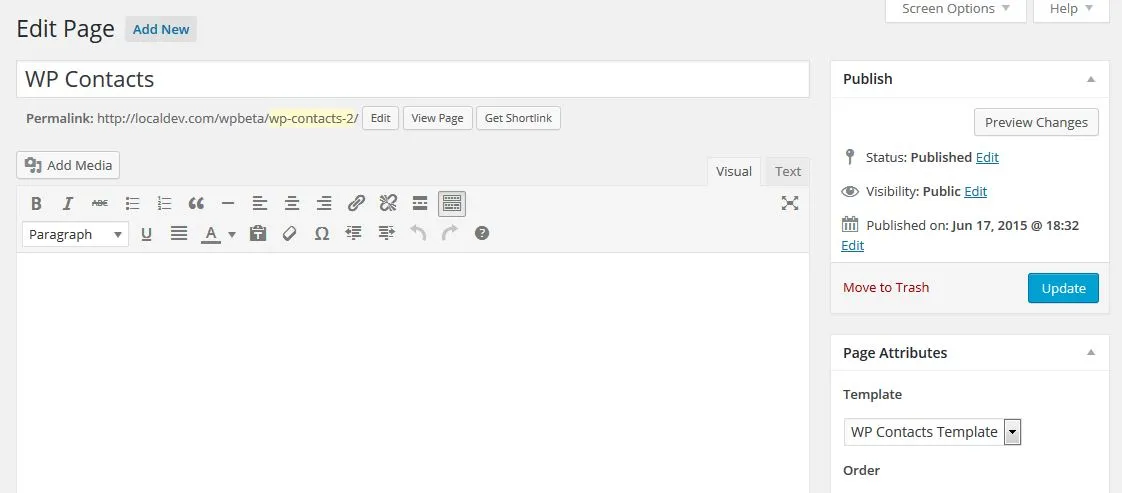
The Main Settings tab has several options that we will go over below: The Main Settings tab starts with telling you to set a page for WP Contacts. You need to do this so that you can display the contacts views on the frontend and work with it once it’s in place. To do so, go to your pages tab in the left menu and either create a new page, or select an existing one to edit.
The page you select or create will need to use our custom template to display the frontend, so select the WP Contacts Template under Page Attributes on the right side when editing the page. Once you save it, this will be the page your contacts will display on. If you have multiple databases you will also need to select the database to assign to the specified page (as in the image above) otherwise the page will just use the default database.

Please note that whatever page you will use for WP Contacts will only output the frontend tool for WP Contacts. Meaning, you’ll want to use a blank page and not something with existing content.
Public Accessibility – Choosing True on this setting would allow everyone read access to your contact information. Not really recommended since most people want to keep this kind of information private but is an option for those that do. Keep in mind that if this is turned on, all users will have at least read only access to the site as well.
Use Pagination – This is recommended in the case you have a lot of contacts all results will be shown in paginated results which you can set on the option below. Pagination settings affect both the main view and the activity log view on the front end.
Pagination Results– Choose between 1 and 200 results to display per page.
Default Front Sort – Added in version 1.2.3, you can change the default sorting of your contacts based on field and direction. The standard default is ID descending (for newest contacts added to display at the top).
Show WP Admin Bar – This setting toggles the display of the WordPress admin bar on and off on the front end and adjusts the page accordingly. We prefer to have it off but this is up to you. This only affects the Contacts front end page.
Primary Color – This setting lets you choose the main color to use for the front end of WP Contacts. You can pretty much use any color besides white since white is the main background color and main text color for respective site areas. If you are comfortable with CSS, you can override styling at the bottom of this tab with pretty much anything you want.
Logo Image – This is your main logo used to display at the top of the side navigation bar. The image will be responsive so it will adjust to the sidebar width.
Keep in mind that it’s probably better to upload a logo that is not larger than the sidebar width (300px) since large images will take longer to load and will become distorted if too large or text will be unreadable when the image is fit into the sidebar area.
Footer Text – This is the text displayed at the bottom of the WP Contacts front end page. Add any text you would like here, this will also be your site’s primary color.
Greeting Text – This text will be shown on the login form when people are logging in to the front end. Be sure to keep the message simple so it’s not too much text on the form.
Export File Name – This is the custom name for the csv or xls export file. Here you name the file that will be downloaded when users export entries from your database.
Entry Image – This setting allows you to enable or disable the contact entry image capability. As shown in the demo, contacts have images related to them and you can upload images to associate with them. A small thumbnail (25 x 25px) will also be generated for the Main page view when you upload an entry image.
Default Entry Image – You can set your own default image to associate with new contacts that do not have an image associated with them yet. Some people might set here an image to visually show that it’s a new contact. If images are enabled and this is not set, the system default will be shown for those not assigned.
Front Page Thumbnail Size – This is the size of thumbnails to display on the main view (frontpage) of WP Contacts and can be set to the size you want. You can also change this after you already have entries and regenerate the thumbnails in the Settings -> Manage Front Page area on the frontend.
Contact Uploads – This enables or disables the ability to upload files associated with a contact. This is one of the features many people have told us would be nice to have with a contact system. If this is enabled, you will have the ability to associate files with contacts on the individual contact page that are available to view and download. Some people would use this for uploading documents or images related to a contact.
When uploading files or images, you will need to be aware of your server’s limitations for file sizes. This will directly affect the size of files that you can upload to your server. You can check the Site Information tab to see your current limits and check with your hosting provider if you need to increase them.
Fixed Edit Column – This enables the ‘quick edit’ menu to stick to the right side of the screen, useful if you have a lot of columns on the main page.
Search All Fields – Enables a ‘Search All’ option to the search capability, take note of the warning as this can impact search result speed.
Enable Events – Choose to enable the events calendar with this database.
Enable Event Notifications – Allows the capability to send alerts for events created on the calendar…make sure and test your server’s email capability if you plan to use this
Calendar New Entries – Enables new entries to display on your calendar
Calendar Date Entries – Enables custom fields that use the Date Time field type to show up on your calendar.
Enable MailChimp Export – Enables MailChimp list syncronization on the Import and Export page
Use WordPress Date & Time – Enables all dates to use the format for date and time ( set in Settings -> General in WordPress Admin Panel) . As a side note, the WordPress datepicker does not support as many formats as PHP so just be aware of that if creating your own custom date formats that are not pre-configured in WordPress.
Custom Menu Links – You can add your own external links or links to other databases on this option that will show up on the Front End main menu.
Custom CSS – We’ve included the capability for you to add your own custom css to WP Contacts. If you are familiar with CSS, you can override many styling elements of WP Contacts and by doing it this way, any automatic updates will preserve your custom CSS code set here. We’ve added custom css classes to the main page table view that you can target with your own custom css (handy for coloring the background of specific data). Each td element will have the following classes that are dynamically generated from the column names and values:
- colnum-x – where x is the numbered column from left to right (e.g. colnum-5)
- col-xxxx – where x is the name you’ve created for that column (lower cased, up to 12 characters of it, without spaces or special characters)
- val-xxxx – where x is the value that the field has (lower cased, up to 12 characters of it, without spaces or special characters)
An example: Lets say you want the background color for all your Sources that have Default set as the value to be grey. Each td element on that page would look like the following…
<td data-th=”Source ” class=”colnum-7 col-source val-default”><a class=”individual-link” href=”http://localdev.com/wpbeta/site2/wcp/?wcp=entry&lead=1″>Default</a></td>So you could create css in your custom css to target this like so
.col-source.val-default {
    background-color: #999999;
}
And that would set all Sources with the value of Default to have grey backgrounds! Be sure to read below and reference our field types page for other custom css examples.
Custom Javascript – Add your own javascript code to WP Contacts in this entry. Useful if you are familiar with javascript and want to add extra functionality to the front end.
Each page now includes a view specific class (full access, ownleads, readonly, and none). If for example you want to hide certain page elements from display based on access (like you don’t want readonly users to see certain information or links) you can target with these classes. For example, let’s say you didn’t want read only users to see your events calendar but you want to use the calendar. You can hide it with CSS code like this…
.wcp-access-readonly .eventslink {
    display:none;
}
This opens the door to all sorts of futher customizations, the page classes are listed below…
wcp-access-full — Full Access
wcp-access-ownleads — Own Leads Access
wcp-access-readonly — Read Only Access
wcp-access-none — No Access
If using custom roles, the page class will include wcp-access-Custom followed by a unique identifier. You’ll need to use Chrome Inspector or similar to find the unique name (e.g. wcp-access-Custom-71491688854489).
You can target specific users as well by adding a class to the page with the current user id in the following format…
wcp-user-xx
Where xx is the id of the currently logged in user.
User id’s can be located by going to your WordPress Menu -> Users and click on the user you want to work with . In the url of your browser you should see the user id in your admin url like ?user_id=1&…
An example for hiding menu links for a user with id 1 is given below…
.wcp-user-1 .drawer-menu li:nth-of-type(2),
.wcp-user-1 .drawer-menu li:nth-of-type(3),
.wcp-user-1 .drawer-menu li:nth-of-type(4),
.wcp-user-1 .drawer-menu .statslink,
.wcp-user-1 .drawer-menu .logginglink,
.wcp-user-1 .drawer-menu .ielink,
.wcp-user-1 .drawer-menu .eventslink {
    display:none;
}
and here is the corresponding mapping for each of those listed above
nth-of-type(2) = Front Page Sorting
nth-of-type(3) = Manage Fields
nth-of-type(4) = Sources Types & Status
.statslink = Statistics
.logginglink = Logging
.ielink = Import & Export
.eventslink = Events
WP Contacts Permissions Tab
Manage Own Leads Ownership Change – This setting allows you to decide if users that are set to manage their own leads can transfer or assign contacts to other users. The default is to allow them to do so, but you can disable that here and they will not be able to transfer or see other users in the system.

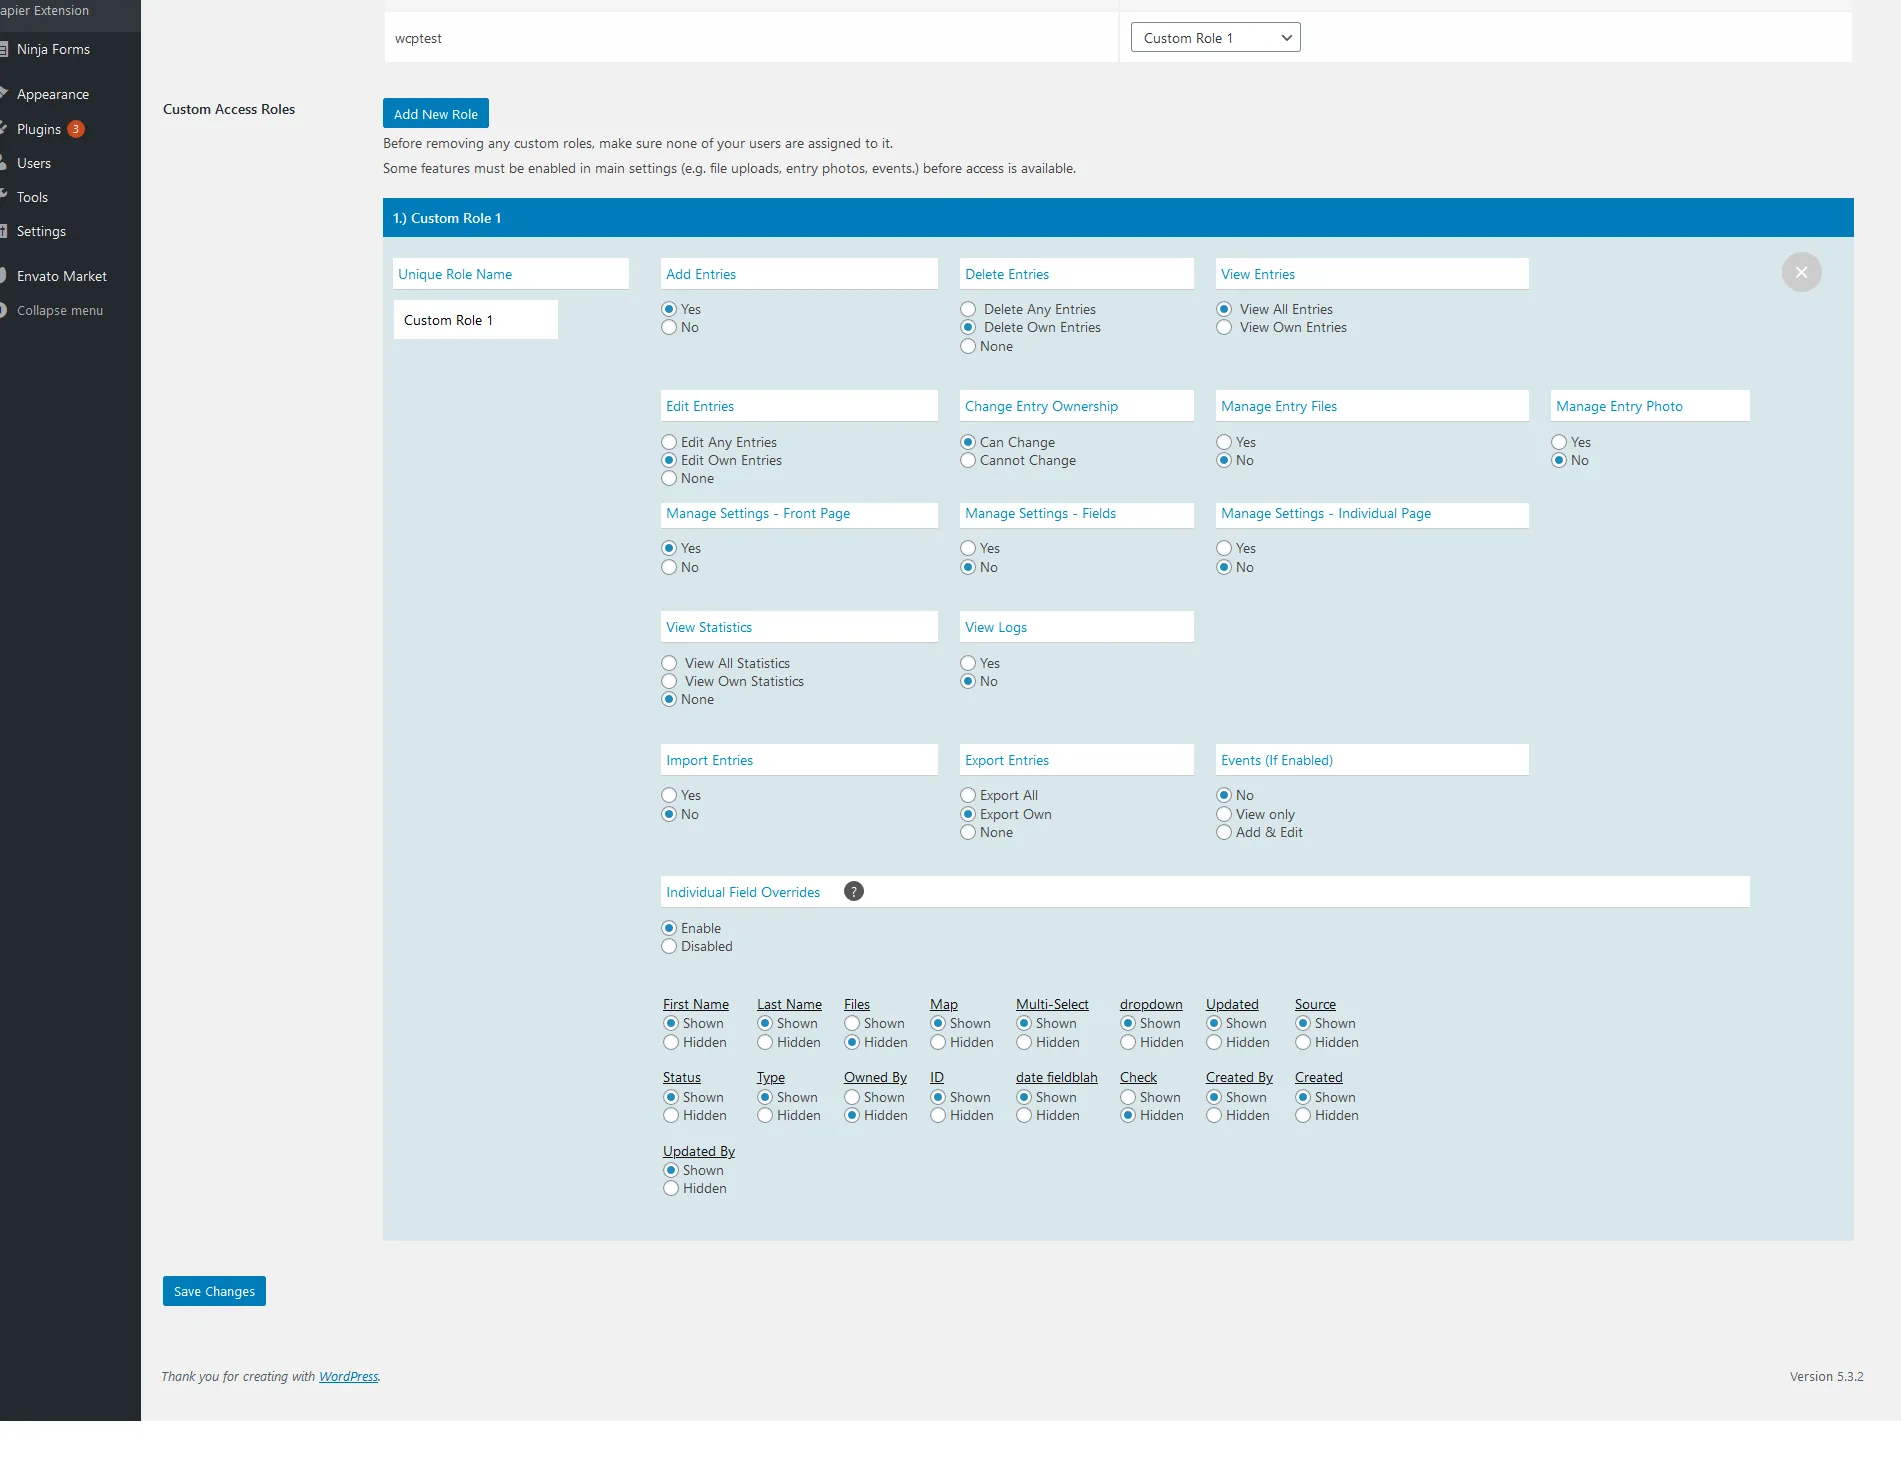
The Permissions tab will contain a list of current WordPress users and their access to using the front end. There are Four levels of built-in access available and there are custom roles as well.
- No Access – Access to WP Contacts is not available for this user.
- Read Only – User can only view contacts and contact information, no editing capabilities are available.
- Manage Own Leads – User can only view, edit and manage their own contacts. They will not be able to see any other contacts.
- Full Access – User has full access to the contacts, statistics, and front end settings.
- Custom Access Roles – Users can be assigned custom roles that you can choose detailed access to the system for. We have improved on the capabilities of our custom access roles to include very detailed settings. As of version 3.2.8 you now have the capability to override specific fields for display in order to hide some information from current roles. In order to use Custom roles simply choose Add New Role on this page, give it a name and select the options for access you want this role to have. After saving, you can assign users to this new role you’ve create.

These permissions are separate from general WordPress permissions and are for WP Contacts only. A couple of things to note are that if you have public accessibility set to true on the Main Settings page, all users will at least have read access. If you add a new user to WordPress, you will have to set their access to WP Contacts as well on this tab (if you want them to have access to the system).
Database Operations
The Database Operations Tab gives you the capability to take snapshots (backups) of your contacts database and do some other handy things if needed. One thing to keep in mind is that if you have a lot of contacts and a lot of files associated with them your servers PHP settings may need to be adjusted for some of the settings listed on the Site Information tab when dealing with backups or restoring data (especially script execution time).
Please Note that restoring or resetting the database will do exactly that. So don’t use these options unless you intend to do so.
Backup Database – You can choose to create a backup of your contacts at any point in time that you would like. Backups are smart to do before doing things like importing a large amount of data so that you can restore a previous backup if you forgot to set something when importing. Creating backups from time to time is a smart thing to do.
Restore Database Backup – Under this section, you can choose to restore your contacts database with a previously created backup you’ve done. Once checked, you will have a selection of current backups to choose from which you will select the backup you want and confirm the restore.
Current Backups – This section lists the current backups that you have in the system. From this section you can also delete unwanted backups in order to save disk space. If you don’t see any in there, you might want to create one!
Reset Database – Resetting the database will revert back to the original state of the database of when you first installed WP Contacts. Some users have requested this option, so we’ve added it in here. Just be aware that this clears out the database. If you have anything important in your WP Contacts, you may want to reconsider using this option.
The Site Information tab will show you your sites current settings for file upload sizes, maximum (simultaneous) file uploads, and maximum execution of a script. If these settings are too low for you, you’ll need to speak with your web host or site administrator about increasing them for your purposes.